I realized I have documentation of the "after" from this "before" post! I hope it helps someone. I would love to hear about it if you decide to use this!*
I got a lot of great "advice tags" back as well-- my favorite? "Be careful on the honeymoon. Babies come quick."
*Note: One visitor made a great suggestion of using sticky labels rather than paper + adhesive. The only reason I didn't do that was because I'd already printed the labels... but the stickers are a much better idea!
Showing posts with label wedding. Show all posts
12.01.2011
10.20.2011
I Did It. I Caved. One Last Wedding Post...About the Photographer
If I could give a bride one piece of advice, it'd be this: hire a great photographer.
You won't remember much of the details (yes, the ones you painstakingly planned with the importance of the apocalypse beforehand), and you'll want a visual time capsule of the day. We were blessed to find our perfect photographers, and I just got back some sneak peeks. Since I am really loving
![]() | ||
The three things that topped my list from the beginning of the wedding planning process:
1. That the day would be a huge celebration with those we love most-- of life, love, God, and family.2. That there would be meaning behind everything involved-- from the dress I wore, to the cake topper.
3. That photographs had to be perfection because the day goes by so quickly and we want to remember it forever.
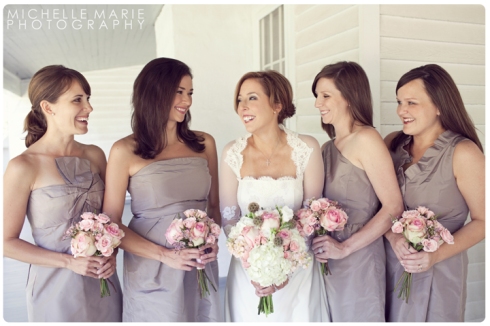
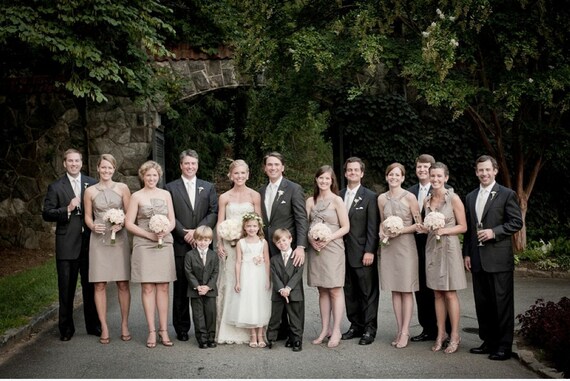
What a blessing-- our photographers were extraordinary. Truly. They are MICHELLE MARIE PHOTOGRAPHY, a married couple that makes, hands down, the most beautiful creations from photographs.
It doesn't hurt that you'd love to have them over to dinner anytime because they are genuinely great, fun people. Who happen to be fantastically talented. (My precious husband even said the pictures "took his breath away." And he's not even a "breath away" kinda guy.)
I absolutely adore how they "got it"-- that is, the concept of "The Farm," why we wanted the wedding there, and the focus on dear friends and family on that day.
Without further ado, perhaps the best decision I made of the (seemingly gazillion) vendor-related decisons: Michelle Marie Photography album, Christina + Stephen {Farm Wedding}.
A few of my favorites, there are lots more on their blog/website:
Thank you Michelle and Steven Lambert of MICHELLE MARIE PHOTOGRAPY for capturing our happy day with style, love, and talent.
9.28.2011
We Do!
So maybe I had a few moments where I felt like this...
![]() |
| our flower girl and ring bearer |
But I am pleased to say all the DIY work paid off, and the wedding was just what we'd hoped. I learned a lot in the process and hopefully will be able to share some of that with other people.
The main thing to remember is something I was told a thousand times and was the complete truth: At the end of the day, you're married. Enjoy every moment. All the little stuff doesn't matter. And it really didn't.
It was a whirlwind but a dream.
Here are a few pictures that have trickled in.... I'll post more (and get off the topic of weddings in general) in the future!
8.30.2011
DIY Wedding: Chapter 3. Etsy Love, Etsy Love.
WeddingChannel.com just informed me that there are 25 days left until the wedding... I would consider myself a mix between Emily Post, Anthony from Sex and the City, and Bridezilla at the moment. (Want to hang out anytime soon? Call me!)
Anyway, I wanted to spotlight the lovely Etsy finds that have come to comprise a LOT of what we're doing for the wedding. I have had such great experiences with every one of these sellers and wouldn't hesitate to recommend any of them at any time.
Invitations: TwoCardinalDay
Anyway, I wanted to spotlight the lovely Etsy finds that have come to comprise a LOT of what we're doing for the wedding. I have had such great experiences with every one of these sellers and wouldn't hesitate to recommend any of them at any time.
Invitations: TwoCardinalDay
Laura, the owner of this shop, is incredible. She designed my invitations from photographs I emailed her and I was so thrilled with how they turned out. I've gotten more compliments on these invitations than I ever could have imagined, and it's because she's got such talent and style. In fact, I took inspiration from this suite she had already done:
![]() |
| "Rustic Romance on the Farm" Sent Laura two pictures of the church and farm where we'll have our wedding and reception, and got this: |
These depict the buildings SO very perfectly, and she did it in 48 hours for only $30 (on top of the $50 listing fee)! All I had to do was buy the cardstock (she helped me find good sources for that, too) and literally took them to FedEx/Kinko's to print. Viola! And I was so happy with the outcome.
Next Etsy find/love:
Handmade, custom order silk ties for $18.95. Yes. $18.95.
![]() |
| rabbitstop on Etsy Vivian at RabbitStop/TieObsessed is incredible. I sent her a picture of my bridesmaid's gowns (exactly like the ones in this picture), and not only did she go to the fabric store that week to find a swatch, she found two and let me choose the one most to my liking. And here you go: |
So, groomsmen's gifts? Check. Matching itty-bitty tie for ring bearer? Check. All for $18.95 a piece. My fiance has declared that he's never buying another tie in store again-- the selection here is amazing and the price can't be beat.
Last up for now:
![]() |
| Bridal Couture on Etsy |
I actually found this shop via StyleMePretty.com which is the site of all things Beautiful Wedding.
And this is no exception. Ce Juane made the fascinator I will wear in my hair and it is exquisite beyond words. They customized it for me, by putting the pearls from the Mina onto the Mia style because I'm wearing pearl earrings.
It's a work of art, for sure, that I hope will be a family heirloom one day. And it was $60.
It's gonna be an Etsy kind of wedding, my friends!
Labels:
accessories,
DIY,
Etsy,
invitations,
jewelry,
wedding
7.21.2011
DIY Wedding Chapter 2: Seed Packets as Wedding Favors
I have seeds coming out of my ears.
Let me explain.
I found some great ideas for making party favors for the wedding involving vintage seed labels, coin envelopes, and a bulk purchase of Sweet Peas, my seed of choice. Luckily my friends are willing to glue, stamp, and seal these packets with me, so it's going pretty quickly. But we are a little like a seed packet factory over here right now.
Instead, I decided that they were going to be guest's wedding favors.
For the bargain price of $3.00, I bought this listing of vintage seed packet covers off Etsy. Once I had the PDF file,
I could (and always can) print as many as I'd like.

The only thing to do then is put in the sweet pea seeds, ordered in bulk from Eden Brothers online garden shop.
For one final fun and personalized touch, I ordered a stamp for the opposite side of the seed packets from this very sweet Etsy seller ForYoo, who I highly recommend for not just reasonable prices on customized wooden stamps, but also for being very fast and friendly!
Let me explain.
I found some great ideas for making party favors for the wedding involving vintage seed labels, coin envelopes, and a bulk purchase of Sweet Peas, my seed of choice. Luckily my friends are willing to glue, stamp, and seal these packets with me, so it's going pretty quickly. But we are a little like a seed packet factory over here right now.
It started when I spied this on Martha's wedding website. Seeds for Save the Dates-- cute!
Since I'm getting married in Georgia, ideally I would have sent out peach seeds but they are about the size of... well, a peach pit.
Instead, I decided that they were going to be guest's wedding favors.
I loved the what I saw here:
And the concept has kind of just grown from there.
There is going to be a sign for guests to "please take one," and in return leave a tag with some words of advice for the future Mr. JoieDeVivre and myself. In my mind, I'm hoping that the seed packet favors that I am hanging up like these below... (just replace the photos with seed packets):
| Style Me Pretty And hopefully by the end of the night, the packets are replaced with little manilla tags (like these)... |
... all containing pearls of wisdom handwritten by guests. (Any suggestions on what to do with those cards later? I was thinking frame them?)
| 500 for $27 |
So here's what I ended up using:
For the bargain price of $3.00, I bought this listing of vintage seed packet covers off Etsy. Once I had the PDF file,
I could (and always can) print as many as I'd like.

The only thing to do then is put in the sweet pea seeds, ordered in bulk from Eden Brothers online garden shop.
Glue the labels onto the packets with spray mount (my new favorite thing):
A great, simple, and economical DIY project!
Labels:
DIY,
save the date,
vintage,
wedding
6.28.2011
Do It Yourself Wedding, Chapter 1: "Will You Be My Bridesmaid?" and Save the Dates
I know in the last post announcing my engagement, I said I would try to keep the topics diverse and not go totally bridalicious on this blog. However, I am going to break that promise with the first post to follow. I'm sorry.
Planning a wedding on a budget can prove challenging; but I have also found it to be really fun thus far because so many of the things I'm doing or want to do are going to be created either by me or by people I love. I am officially addicted to the Style Me Pretty wedding blog, because it is a sheer eye candy with a lot of inspiration in between. And wouldn't you know it, they have an entire section devoted to DIY.
First project up was asking my bridesmaids to be in the wedding. This was an important decision to me and every girl was chosen for a very specific and special reason. So, I wanted to make them feel special when they opened their envelope, and wanted to have it in keeping with a "formal" invitation to be in the wedding party.
I found this amazing little idea while researching ways to ask a bridesmaid to be a bridesmaid from Once Wed (another fabulous wedding idea website).
Here's my result. The girl who originated the idea did a better job, but I can say firsthand I had a lot of fun doing it myself!
I think one of the most fun parts was creating the hairstyles to "match" the ladies... out of construction paper!
I also decided that my Save the Dates would be handmade. To me, Save the Dates set a certain tone for the wedding, giving those you invite a sneak peek to the event to come. Since my wedding is going to be at a family farm that is very near and dear to my heart, I wanted to incorporate that into the Save the Dates.
I also love when people send magnets that you can put on your fridge and throw away the big card... so I added that element too.

After a lot of formatting via Microsoft Word (mine ended up being an A4 size, so I should have started with that template from the beginning), I made a design with some more fun fonts. (DaFont is my go-to site for free downloadable fonts). Then I bought some Ecru cardstock in bulk and cut it in half to make it go further. Notice there are some hash marks in the middle of the card; that's for the magnets
Planning a wedding on a budget can prove challenging; but I have also found it to be really fun thus far because so many of the things I'm doing or want to do are going to be created either by me or by people I love. I am officially addicted to the Style Me Pretty wedding blog, because it is a sheer eye candy with a lot of inspiration in between. And wouldn't you know it, they have an entire section devoted to DIY.
D.I.Y.
Those letters are going to be my mantra during the wedding planning process. Here's how I've done thus far.
First project up was asking my bridesmaids to be in the wedding. This was an important decision to me and every girl was chosen for a very specific and special reason. So, I wanted to make them feel special when they opened their envelope, and wanted to have it in keeping with a "formal" invitation to be in the wedding party.
I found this amazing little idea while researching ways to ask a bridesmaid to be a bridesmaid from Once Wed (another fabulous wedding idea website).
Here's my result. The girl who originated the idea did a better job, but I can say firsthand I had a lot of fun doing it myself!
Items used:
-Construction paper (hair color, skin color, dress color... which didn't actually match the real dress color :)
-Glue Stick. A throwback to third grade! You could also use Spray Mount if you're a bit more crafty.
-Cardstock for information card, with a few fun fonts
-Any relevant info the ladies will need to get their bridesmaid process started.
I also decided that my Save the Dates would be handmade. To me, Save the Dates set a certain tone for the wedding, giving those you invite a sneak peek to the event to come. Since my wedding is going to be at a family farm that is very near and dear to my heart, I wanted to incorporate that into the Save the Dates.
I also love when people send magnets that you can put on your fridge and throw away the big card... so I added that element too.

After a lot of formatting via Microsoft Word (mine ended up being an A4 size, so I should have started with that template from the beginning), I made a design with some more fun fonts. (DaFont is my go-to site for free downloadable fonts). Then I bought some Ecru cardstock in bulk and cut it in half to make it go further. Notice there are some hash marks in the middle of the card; that's for the magnets
I then took a picture I had of the farm, and Photoshopped it to look vintage.
Then I used Photoshop once more to put my favorite Bible verse (Joshua 24:15, "As for me and my house, we will serve the Lord") on the magnet, as well as our names and the wedding date-- so the magnet would have all the info guests may need, and they could chunk the card. I also liked that the verse coincided with the picture of the house.
I should mention here that I am by no means a Photoshop pro; I had to Google almost every aspect of "how to" (insert font, blur picture, etc.) but eventually, after a lot of playing, was able to achieve the look I wanted.
I printed this picture in rows in word, formatting a table with the dimensions I wanted for the magnet. I stuck them on blank adhesive business card magnets from an office supply store (only $22 for 100 magnets here), and, my Save the Date magnet was born.
The last step was using an Xacto knife to cut slits on the printed hash marks, and sit the magnet into the card. The final result:
I know I can't spend this much time on every aspect of the wedding, but this was some fun crafting for the not-so-crafty girl!
5.21.2011
I Do
I am so grateful.
September 24, 2011, I'm marrying a very great man. We are saying our vows in a place close to my heart.
I will try to keep the blog topics away from all things wedding, but it will probably be a hot topic here for awhile.
"For I know the plans I have for you," declares the LORD. "Plans to prosper you and not to harm you, plans for hope and a future." Jer. 29:11
Subscribe to:
Posts (Atom)