1.11.2014

Sewing for Dummies: Best tutorials for the sewing newbie


This summer I was cruising Craiglist for things I want but don't need, and I across a Singer embroidery/sewing machine. It was in awesome condition and a great price... I decided on the spot that I was going to teach myself to sew.

Fast-forward to now and I have a lot of hours of sewing practice under my belt.  One thing I quickly learned after trying and failing many times to successfully complete a pattern I purchased at a fabric store (from McCalls, Simplicity, etc.) was that it didn't matter if the words "SEW EASY" were on the front; I wasn't going to finish it. Or if I did, the final product looked like a middle school Home Ec version of the awesome garment on the front.

I told my sad story to a girlfriend who owns her own store of children's clothes she makes (she's amazing, visit her store here) and she said something that totally changed the ballgame for me.

"Your first problem is that you're using patterns made by those huge companies. Try looking online for tutorials and PDFs."

The one drawback is that a pattern downloaded online comes as a PDF to your printer; thus, you have to cut and tape together the pattern. But to me, this is almost as tedious as cutting the patterns from a company pattern anyway.

Here are the ones I find myself going to a LOT. They are either free, or ones I've purchased that I found to be worth it. Keep in mind I mainly sew things for my 16 month old, so there's a lot of baby and boy clothes on this list. I'll try and categorize so you can skip over anything you're not interested in. Click on the pictures to go to the link or a Pinterest pin that will take you there.

Baby Items:

 1. FREE Baby burp cloths (The author of this website, Dana Made It, has almost singlehandedly taught me to sew and you will see a few more of hers on this list. Her tutorials are AWESOME, full of pictures, and are written so clearly. A must for anyone new to sewing.)

Click for link
Via

Turn all those swaddle blankets into PJ's for the kiddo:
Via
FREE Baby bib tutorial and pattern (makes a great baby gift)
Via
FREE Baby Boy Romper tutorial and pattern. This one I didn't use as much as the following, but it is free and has good pictures. Melly Sews is also a great and informative website for newbies.
Via

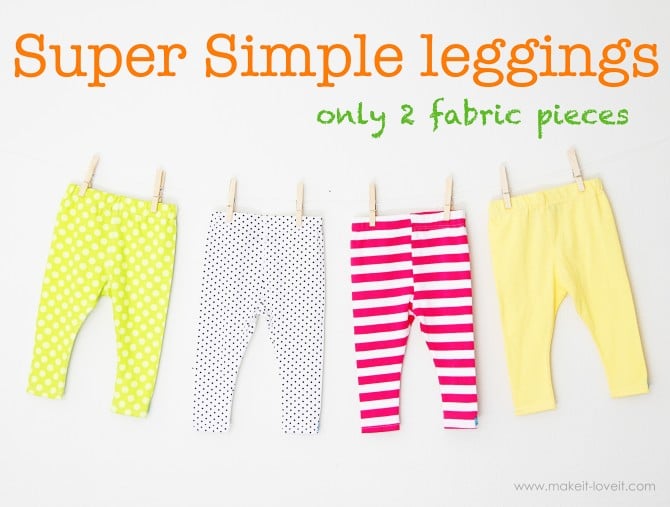
Simple Leggings... I made the heck out of these. They are great for hipster baby boys or of course, for little girls.
Via
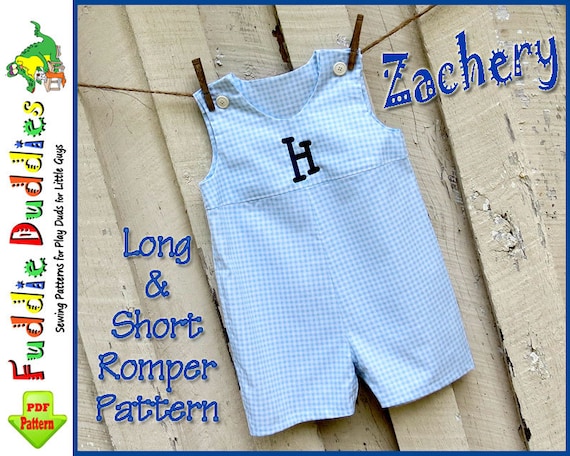
This pattern was only $6.95 on Etsy and is super-easy to follow. I had a hard time at first with the lining/outer layer aspect of rompers, and this pattern lead me to the first successful, complete outfit.
Fuddie Duddies on Etsy

Kid Items:

1. Another one from Dana Made It. Kid pants! So easy once you get the hang of it!
Via

2. A modification of the above-- the kid tuxedo stripe pant. Too cute. Made by Rae is another website I loved as just a generally great resource.
Via
3. Another by Rae I use all the time is this skinny t pattern that I purchased for around $7. Another one well worth the money, in my opinion. And there are lots of other tutorials on modifications of this pattern, like a button-down cardi (too cute).
Via

Around the Home Items:

PILLOWS are something I love to make now... changing out a pillow can really change up a room, and a lot of times you can make one from a great remnant on sale at the fabric store. Here are some of my favorite pillow tutorials:
Via
Via


Via

Sewing projects for the home, courtesy of Martha Stewart:
Via
Coffee cozies make cute little gifts, don't take long to make, and make you feel accomplished for finishing so quickly.
Via
For all those scraps you have after making aforementioned projects:
Via
A great email list to subscribe to is AllFreeSewing. They send projects every day that really are worth taking a look at, and are done by theme. Most of them are in the "easy" category, which means I like it that much more.

Need your sewing to look professional? Check out this pin:
Via


post signature

12.17.2013

Possibly the best and easiest Christmas cookie ever: YiaYia's Greek Koulourakia Recipe With Printable


Anyone that knows me knows that I'm a late bloomer when it comes to cooking. It wasn't until getting married that I really got my hands dirty in the kitchen (pun intended). I love to cook now, and love to experiment with desserts in particular.

But in our family, there is one thing you don't mess with: YiaYia's Koulourakia cookies. They're pronounced "Kew-doo-la-kia," but we call them Koodles for short. They are easy to make and have a universal appeal because of their plain, shortbread-like flavor.

I feel it's my duty to add this koulourakia recipe to the Interwebz, because it's straight from my grandmother's mouth. Not an exaggeration-- I got this recipe from my YiaYia over the phone in 2006 when the 2nd grade class I was teaching purchased a page in a cookbook for me and I had nothing but "how to make a bowl of cereal" in my cooking arsenal.

What you see below is pretty much what YiaYia told me, verbatim, on how to make these cookies, and what ended up in the cookbook. 

These cookies are legendary to my family.  We fight over them in our house; we devour them for breakfast, and dunk them in coffee as a midday snack. I hope you enjoy them as much as we do. Feel free to share this with anyone you please, as it's not top-secret... but it is much-loved. Printable 5x7 recipe card at the bottom of the post.

Ingredients: 


  • 2 sticks of butter at room temperature
  • 3 eggs
  • 4 cups flour
  • 1 cup sugar
  • 1 tsp vanilla
  • 3 tsp baking powder
  • sesame seeds (optional)

Directions:

Preheat oven to 350. Beat together butter (make sure it's room temperature, this is very important for consistency!) and flour in a bowl until completely mixed.
Knead in baking powder. Form a donut shape with the dough in the bowl (leaving a concave hole in the middle).
In a separate bowl, beat together eggs, sugar, and vanilla to make an egg mixture.
Pour egg mixture into the hold in the dough. (Leave a little to use as a wash at the end). Knead together until well-blended.

The dough shouldn't be sticking to your hands once all this is blended. If it does, simply add more flour until you get a consistency that is pliable but not sticky.


Take heaping tablespoons of dough and shape in "S," "O," and "X" to form cookies. You could also roll them up and give them a little twist. Get creative!
Place on a prepared greased sheet. Wash with egg mixture and sprinkle with sesame seeds or sugar, as desired.
Bake at 15-20 minutes or until golden brown. Turn off heat, transfer cookies to baking pan, and cool inside oven on wire rack.

Enjoy! This batch passed the ultimate taste test in our house:


The cookbook page

Click here for recipe card


post signature

10.23.2013

DIY Baby Door Hanger (Not Your Traditional Wreath)

Here's a fun little DIY that evolved from yet another Pinterest-inspired project. One of my dear friends recently had a little boy, and for her shower I was in charge of the decor-- including the door hanger. Originally, I had thought we'd do a wreath. But that quickly changed after I started playing around.


I was at Hobby Lobby looking for ideas and came across a pretty white shadowbox (it was also 50% off at the time) which came with beautiful pearl pushpins.  I loved the idea of mama being able to customize it, change it out, and display whatever she wanted... because we all know that babies grow fast and there's a lot we want to showcase about them!

Since baby boy wasn't born yet, I asked my friend for his sonogram picture. That would be the top portion of the box until he was born, then she could switch it out to his newborn picture. The bottom portion would be for "info," in this case his full name.*

*There are several places you'll see what looks like blanks under baby Maddox's name; I blurred it out for the sake of this post.

What you need:

1. 8.5" x 11" (approximately) shadowbox with pretty pushpins included
2. 5" x 7" picture
3. Fabric to customize backing
4. Hot glue 
5. Any embellishments you want to include-- for me, it was a "frame" made out of cardstock, and cardstock cut 6" x 8"
6. Scrapbook paper
7. Modge Podge (optional)
8. Home printer (optional)


Making the door hanger:

1. The first step was to customize the blank background. I chose a gender-neutral green chevron on printed duck. This is a permanent feature of the shadowbox, so make sure whatever fabric you choose doesn't overpower the items you'll be pinning onto the Styrofoam backing. Hot glue this to the backing.
2.  You can make this as simple or as fancy as you want. For example, I added a "frame" to serve as a border for the cardstock. To make the cardstock more durable, I used Modge Podge on it.


3.  Now it's time to create what you'll be pinning onto the background. For the purposes of the shower, I did a "welcome" sign. I gave my friend a few other things for her to use once the baby arrived: a "baby stats" page, a baby sleeping sign, and a welcome to baby's room sign (the last two interchangeable in the frame. This is a little hard to describe... check the pictures, they should explain it better than I'm doing!


I liked the idea of mom being able to change out the signs with ease, depending on what was going on at the moment.

Here's the final result. I put it next to a lamp for size reference.

I hope it gives you some inspiration on getting creative with door hangings!

post signature

10.14.2013

How-To: Super Simple Painted Polka Dot Pumpkins

I debated whether or not to even make a "how to" post for this, it was so easy. But I liked the end result and thought I would share. I wanted something other than the traditional orange pumpkin on the porch, but didn't want to pay the $30+ the local garden shop was charging for blue and sage Cinderella pumpkins. This is what I did.

What you'll need:

1. Spray paint in whatever colors/finish you choose
2. Pumpkin carving utensils
3. A drill (with various bit sizes if you want variety in your design)

Our Wal-Mart has massive orange pumkpins for $3 (and white pumpkins for $5... I snagged some of those two and am leaving them white). I bought two regular old orange pumpkins, and a bag of cutie little pumpkins for $3.59. Then came home and raided my paint aresnal.

I used Krylon spray paint in Ocean Breeze (which is more a Tiffany blue than aqua) left over from painting our outside furniture.  I also had some metallic gold, which I ended up loving on the pumpkins. You can of course paint whatever color you like... I think a glossy red would be gorgeous, or metallic black.

Full disclosure, I did this project on a whim without any planning and it's not the neatest job in the world. I also didn't prime my pumpkins with anything; just covered the stems with painter's tape and went to town. I'll make sure and amend this post if paint starts flaking or anything else tells me I should have primed.

1. Paint your pumpkins: The dry time for this is about an hour. I let them dry overnight since I would be handling them a lot. It's important not to spray too much, so the paint won't drip down the sides (unless that's the look you're going for, which could be pretty!).

Dry paint... and baby legs
I thought the itty bitty pumkpins turned out particularly cute in the gold.
The pups liked them too.

2. Clean out the pumpkins

The next part is just traditional pumpkin carving; slice open the top, pull out all the seeds and strings, and hollow out your pumpkin. It's really important to get all the strings, since you're going to want your polka-dots to be nice and round, without any obstruction from the inside.

Via

3. Plan your design

I had an idea of what I wanted in my head after seeing this picture on Pinterest:

There's lots of great ideas online for design inspiration, some of which I'll add at the end of this post.

4. Get your drill on

Try to go straight in, don't let your hand wobble or you will have texture on the edges of your polka dots. I learned this the hard way.


Once you've completed your design, you are done! I wish the dots on the pumpkin on the right were a little more uniform, but that's what I get for drilling with out drafting.

Easy peasy!

More drilled pumpkin inspiration:


 post signature