
What you'll need:
1. Spray paint in whatever colors/finish you choose2. Pumpkin carving utensils
3. A drill (with various bit sizes if you want variety in your design)
Our Wal-Mart has massive orange pumkpins for $3 (and white pumpkins for $5... I snagged some of those two and am leaving them white). I bought two regular old orange pumpkins, and a bag of cutie little pumpkins for $3.59. Then came home and raided my paint aresnal.
I used Krylon spray paint in Ocean Breeze (which is more a Tiffany blue than aqua) left over from painting our outside furniture. I also had some metallic gold, which I ended up loving on the pumpkins. You can of course paint whatever color you like... I think a glossy red would be gorgeous, or metallic black.


Full disclosure, I did this project on a whim without any planning and it's not the neatest job in the world. I also didn't prime my pumpkins with anything; just covered the stems with painter's tape and went to town. I'll make sure and amend this post if paint starts flaking or anything else tells me I should have primed.
 1. Paint your pumpkins: The dry time for this is about an hour. I let them dry overnight since I would be handling them a lot. It's important not to spray too much, so the paint won't drip down the sides (unless that's the look you're going for, which could be pretty!).
 |
| Dry paint... and baby legs |
 |
| The pups liked them too. |
2. Clean out the pumpkins
The next part is just traditional pumpkin carving; slice open the top, pull out all the seeds and strings, and hollow out your pumpkin. It's really important to get all the strings, since you're going to want your polka-dots to be nice and round, without any obstruction from the inside. |
| Via |
3. Plan your design
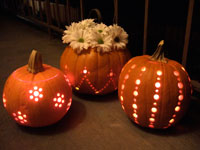
I had an idea of what I wanted in my head after seeing this picture on Pinterest:There's lots of great ideas online for design inspiration, some of which I'll add at the end of this post.
4. Get your drill on
Try to go straight in, don't let your hand wobble or you will have texture on the edges of your polka dots. I learned this the hard way.

Once you've completed your design, you are done! I wish the dots on the pumpkin on the right were a little more uniform, but that's what I get for drilling with out drafting.
Easy peasy!

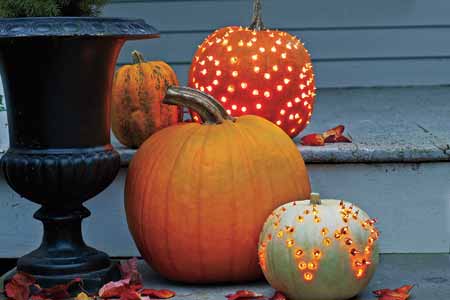
More drilled pumpkin inspiration:


I have seen first time painted pumpkins. you have creative mind for such these things.
ReplyDeleteoffice.com/setup
Super Simple Painted Polka Dot Pumpkins · I debated whether or not to even make a post for this, it was so easy. But I liked the end result.
ReplyDeleteNice post, you give the clear idea of the topic and I subscribed your blog
ReplyDeleteDiazepam for sale
Buy Valium 10mg tablet
Buy Ambien Online
Buy Ambien 10mg Online
Best Sales CRM
ReplyDelete