Planning a wedding on a budget can prove challenging; but I have also found it to be really fun thus far because so many of the things I'm doing or want to do are going to be created either by me or by people I love. I am officially addicted to the Style Me Pretty wedding blog, because it is a sheer eye candy with a lot of inspiration in between. And wouldn't you know it, they have an entire section devoted to DIY.
D.I.Y.
Those letters are going to be my mantra during the wedding planning process. Here's how I've done thus far.
First project up was asking my bridesmaids to be in the wedding. This was an important decision to me and every girl was chosen for a very specific and special reason. So, I wanted to make them feel special when they opened their envelope, and wanted to have it in keeping with a "formal" invitation to be in the wedding party.
I found this amazing little idea while researching ways to ask a bridesmaid to be a bridesmaid from Once Wed (another fabulous wedding idea website).
Here's my result. The girl who originated the idea did a better job, but I can say firsthand I had a lot of fun doing it myself!
Items used:
-Construction paper (hair color, skin color, dress color... which didn't actually match the real dress color :)
-Glue Stick. A throwback to third grade! You could also use Spray Mount if you're a bit more crafty.
-Cardstock for information card, with a few fun fonts
-Any relevant info the ladies will need to get their bridesmaid process started.
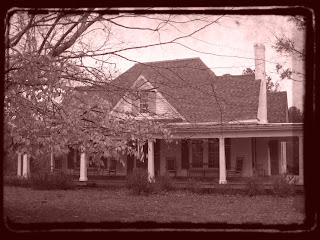
I also decided that my Save the Dates would be handmade. To me, Save the Dates set a certain tone for the wedding, giving those you invite a sneak peek to the event to come. Since my wedding is going to be at a family farm that is very near and dear to my heart, I wanted to incorporate that into the Save the Dates.
I also love when people send magnets that you can put on your fridge and throw away the big card... so I added that element too.

After a lot of formatting via Microsoft Word (mine ended up being an A4 size, so I should have started with that template from the beginning), I made a design with some more fun fonts. (DaFont is my go-to site for free downloadable fonts). Then I bought some Ecru cardstock in bulk and cut it in half to make it go further. Notice there are some hash marks in the middle of the card; that's for the magnets
I then took a picture I had of the farm, and Photoshopped it to look vintage.
Then I used Photoshop once more to put my favorite Bible verse (Joshua 24:15, "As for me and my house, we will serve the Lord") on the magnet, as well as our names and the wedding date-- so the magnet would have all the info guests may need, and they could chunk the card. I also liked that the verse coincided with the picture of the house.
I should mention here that I am by no means a Photoshop pro; I had to Google almost every aspect of "how to" (insert font, blur picture, etc.) but eventually, after a lot of playing, was able to achieve the look I wanted.
I printed this picture in rows in word, formatting a table with the dimensions I wanted for the magnet. I stuck them on blank adhesive business card magnets from an office supply store (only $22 for 100 magnets here), and, my Save the Date magnet was born.
The last step was using an Xacto knife to cut slits on the printed hash marks, and sit the magnet into the card. The final result:
I know I can't spend this much time on every aspect of the wedding, but this was some fun crafting for the not-so-crafty girl!


No comments:
Post a Comment